By default, Blogger allows you to arrange your content into categorize with the help of labels. It is always considered as a handy practice to label your posts to a specific category so that users can easily find relevant content not by searching your whole blog but by looking into a specific label or a category. This makes your site more user friendly, but also useful for search engines too. You can display labels in the sidebar or anywhere in your site which are list or cloud style. In this article, we will show you how to style labels in blogger.
Before you get started with this tutorial, we would recommend you to go through how to add labels in your posts so that you can understand with a lot more authority.
Go to Blogger >> Add a gadget >> Labels >> (Select label cloud in types) and save the widget. Now it depends on you where you would like to place it either in the sidebar or footer.
Now you might see a label cloud on your site after following the above instruction but it may not be as pretty or attractive as you might be looking for so add the following CSS coding in your template just above the skin tag.
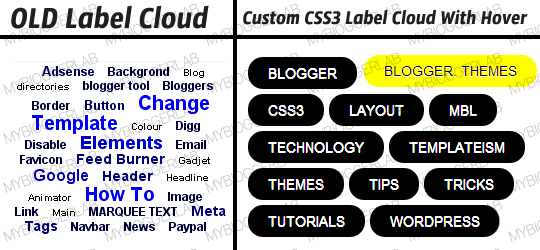
You can always customize the CSS according to your likings, here’s a demo of what you will see after applying the above code in your template.
The very first thing you need to do is to take care of which CSS Class or ID that is been used by your blogger template to display labels. You can use Google Chrome’s inspect element to figure that out. Right click on the label and select “Inspect elements” this will open up a window at the bottom of your screen just as it is shown in the screenshot below:
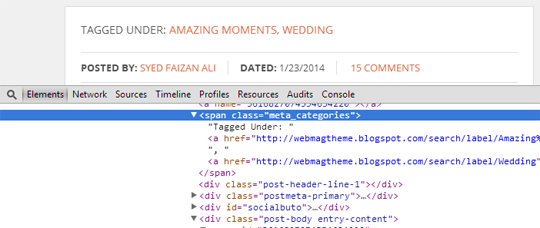 In the above screenshot, you can see the theme is using tags for CSS class. Now you can use the following CSS code to style it according to your desire needs and requirements. Note: if you are using any other class or ID then just edit the CSS accordingly.
This is the end result of what you will see on your site. However, you can customize it according to your likings.
 We hope this beginner’s guide to style labels in blogger would have helped you in not only customizing your template but also some blogger template developers who keep on asking that how to display labels in posts in blogger.
Before you get started with this tutorial, we would recommend you to go through how to add labels in your posts so that you can understand with a lot more authority.
Display All Labels with Post counts in Blogger:
Some popular sites tend to display all labels on their error or not found pages to provide users a few set of options that they can use to find a relevant topic. However, some sites display them in either sidebar or footer so here’s how you can display all labels with post counts in a form of label cloud:Go to Blogger >> Add a gadget >> Labels >> (Select label cloud in types) and save the widget. Now it depends on you where you would like to place it either in the sidebar or footer.
Now you might see a label cloud on your site after following the above instruction but it may not be as pretty or attractive as you might be looking for so add the following CSS coding in your template just above the skin tag.
You can always customize the CSS according to your likings, here’s a demo of what you will see after applying the above code in your template.
Styling Labels in your Posts Meta Information:
The majority of Blogger templates comes with a nicely style post information meta data that displays labels that you have tagged your post with in post editor. However, some old templates don’t have this functionality or if they do they are not attractive anyway, or you may like to style them differently.The very first thing you need to do is to take care of which CSS Class or ID that is been used by your blogger template to display labels. You can use Google Chrome’s inspect element to figure that out. Right click on the label and select “Inspect elements” this will open up a window at the bottom of your screen just as it is shown in the screenshot below:
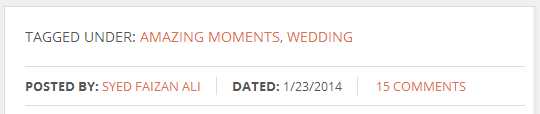
This is the end result of what you will see on your site. However, you can customize it according to your likings.
Comments
Post a Comment